Classic car owners love to talk about their car’s paint or their car’s engine. But for those of us who love to drive, there’s one typically overlooked component that can affect the overall experience behind the wheel more than anything else: the seat. After all, this is where you sit to enjoy your car. Shouldn’t it be comfortable?

You may think that your seat is just fine, but it’s just as likely that you’ve become accustomed to worn foam and broken springs under a decent seat cover. Think about it this way: Cars from the muscle era are now pushing 50. How many times over the years has a driver plopped down behind the wheel and smashed that old foam and those ancient springs?

Fortunately, bringing a seat back up to snuff isn’t especially difficult with the right parts and a few tricks from an interior pro.

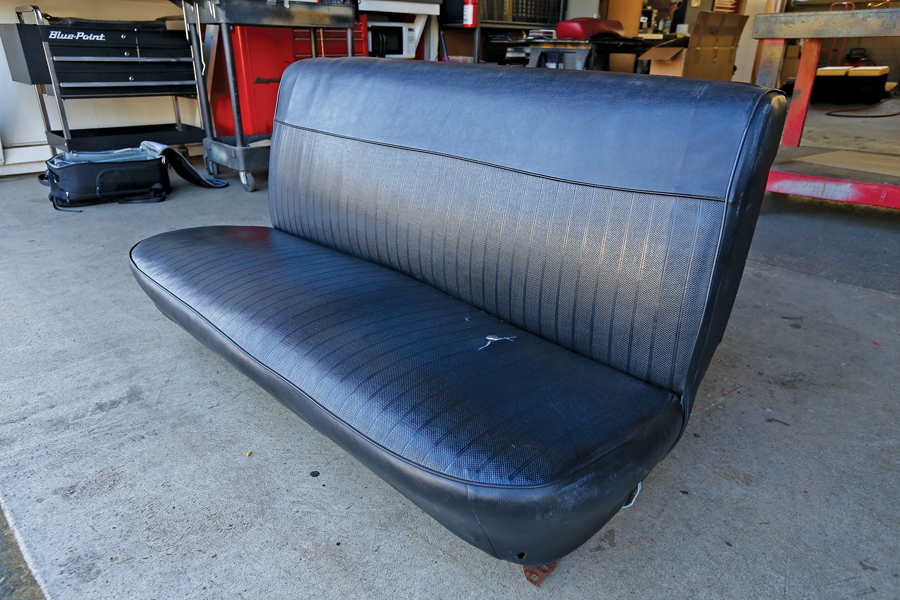
We took Auction Editor Chad Tyson’s front bench seat out of his 1967 Impala — complete with bus-style generic seat cover installed sometime in the 1970s — and ordered a new OE-style cover and foam kit for it from Lutty’s Chevy Warehouse. We then took it all over to Rick Redmond at AIR Automotive for a quick lesson in seat revival. Here’s how we did it.

Parts List:

  • Lutty’s Chevy Warehouse (www.luttyschevy.com, 724-265-2988)
    • P/N 13990 Black front bench seat cover, $345
    • P/N 12614 Bench seat foam kit, $259
    • P/N 5405 Hog Rings, $2 (two packs required)

Special thanks to Richard Redmond at AIR Automotive (503-997-9596)

Time spent: Four hours
Difficulty: 3/5

  1. Before starting any work on a seat, verify that you have the correct covers. We took everything out of its packaging and laid it all out flat to both check on the pattern and let any wrinkles settle out of the vinyl.
    Before starting any work on a seat, verify that you have the correct covers. We took everything out of its packaging and laid it all out flat to both check on the pattern and let any wrinkles settle out of the vinyl.
  2. Next up, removal of the old cover. The vinyl is fastened on with hog rings in about 100 places — best bet here is a pair of diagonal pliers, which can either twist them free or cut them.
    Next up, removal of the old cover. The vinyl is fastened on with hog rings in about 100 places — best bet here is a pair of diagonal pliers, which can either twist them free or cut them.
  3. Since this bench is a fixed bench, pulling up the cover revealed four bolts that held the back rest to the seat bottom. We removed them to pull the seat apart. This is a good time to look for things that had fallen into the seat over the years — we found a pen, about $1.70 in coins, and a 1980s pawn-shop receipt from a place in Rome, GA, for a $50 rifle sold to someone named Chris.
    Since this bench is a fixed bench, pulling up the cover revealed four bolts that held the back rest to the seat bottom. We removed them to pull the seat apart. This is a good time to look for things that had fallen into the seat over the years — we found a pen, about $1.70 in coins, and a 1980s pawn-shop receipt from a place in Rome, GA, for a $50 rifle sold to someone named Chris.
  4. Stripping the seat base revealed crumbling foam and burlap under cotton padding, all held together with more hog rings. We removed it all, after taking note of how thick it all was before tearing it away.
    Stripping the seat base revealed crumbling foam and burlap under cotton padding, all held together with more hog rings. We removed it all, after taking note of how thick it all was before tearing it away.
  5. Two side support springs on the driver’s side of the seat were broken from entry and exit over the years. They’d been propped up with foam during the last seat re-cover. This fix worked, but it also caused a left-hand lean for the driver, so we’re going to correct it.
    Two side support springs on the driver’s side of the seat were broken from entry and exit over the years. They’d been propped up with foam during the last seat re-cover. This fix worked, but it also caused a left-hand lean for the driver, so we’re going to correct it.
  6. Our back rest foam and cotton padding, while original, was still in great shape. We elected to reuse it, as most of the seat’s battle damage was focused on the bottom.
    Our back rest foam and cotton padding, while original, was still in great shape. We elected to reuse it, as most of the seat’s battle damage was focused on the bottom.
  7. After removing all the seat-bottom foam and wire-brushing the frame, we focused on fixing those broken springs. Replacements may be available, but we decided to fix what we had using new spring material. After cutting new steel to length, Rick used heavy felt and hog rings to hold the new spring in place over the old broken sections. Can’t weld this stuff without making it brittle.
    After removing all the seat-bottom foam and wire-brushing the frame, we focused on fixing those broken springs. Replacements may be available, but we decided to fix what we had using new spring material. After cutting new steel to length, Rick used heavy felt and hog rings to hold the new spring in place over the old broken sections. Can’t weld this stuff without making it brittle.
  8. To make the driver’s side of the seat equally as stiff as the passenger’s side, Rick built a new foam pad lined with half-inch jute felt on the top and bottom. This helped to support the new spring material and gave the driver’s side a much firmer feel.
    To make the driver’s side of the seat equally as stiff as the passenger’s side, Rick built a new foam pad lined with half-inch jute felt on the top and bottom. This helped to support the new spring material and gave the driver’s side a much firmer feel.
  9. Here’s a trick fix: zip ties. We ran two rows across the seat, cinching them up slightly to help transfer weight across the seat bottom.
    Here’s a trick fix: zip ties. We ran two rows across the seat, cinching them up slightly to help transfer weight across the seat bottom.
  10. Any place that seat springs might touch can be a source of noise, so Rick cut out and affixed half-inch jute felt sections with hog rings inside the springs where contact might occur. There are two main areas: the front of the seat, and at the rear where the springs can contact the frame.
    Any place that seat springs might touch can be a source of noise, so Rick cut out and affixed half-inch jute felt sections with hog rings inside the springs where contact might occur. There are two main areas: the front of the seat, and at the rear where the springs can contact the frame.
  11. We ordered a replacement high-density foam kit for this seat, but it doesn’t include everything you’ll need to do the job. First comes a layer of burlap, followed by half-inch jute felt. Rick measured out enough for the seat bottom, cut it all out, and glued it together. Just be sure that your pad fits under the new cover.
    We ordered a replacement high-density foam kit for this seat, but it doesn’t include everything you’ll need to do the job. First comes a layer of burlap, followed by half-inch jute felt. Rick measured out enough for the seat bottom, cut it all out, and glued it together. Just be sure that your pad fits under the new cover.
  12. Once the new foam is centered up on the frame, we glued it down to the jute pad using contact cement.
    Once the new foam is centered up on the frame, we glued it down to the jute pad using contact cement.
  13. Next up is the seat cover. OEM covers came with metal wire inserted in the seat cover perimeter, which gives the new hog rings something to grab and pull against. You can reuse the original wires, but here we elected to make new ones and ran them through the sewn-in channels in the new seat cover.
    Next up is the seat cover. OEM covers came with metal wire inserted in the seat cover perimeter, which gives the new hog rings something to grab and pull against. You can reuse the original wires, but here we elected to make new ones and ran them through the sewn-in channels in the new seat cover.
  14. We then lined up the center of the seat cover with the center of the seat and started installing hog rings at the rear along the wire.
    We then lined up the center of the seat cover with the center of the seat and started installing hog rings at the rear along the wire.
  15. Stretch one front corner of the cover over the foam, and then the other. Keep checking fit and adjust as you go.
    Stretch one front corner of the cover over the foam, and then the other. Keep checking fit and adjust as you go.
  16. We weren’t happy with the fit around the corners, but a quick blast with a sanding disc took off the foam’s edge and made the cover fit much better.
    We weren’t happy with the fit around the corners, but a quick blast with a sanding disc took off the foam’s edge and made the cover fit much better.
  17. Once we were satisfied with the edges, we pulled down the front of the cover in the center and started to hog ring, working out toward the sides.
    Once we were satisfied with the edges, we pulled down the front of the cover in the center and started to hog ring, working out toward the sides.
  18. After checking and double-checking the fit, we stretched and secured each side of the cover. Always ensure that your seat cover is tight, as a loose cover wears out quickly.
    After checking and double-checking the fit, we stretched and secured each side of the cover. Always ensure that your seat cover is tight, as a loose cover wears out quickly.
  19. With the lower seat complete, we set it aside and started on the back. Here we covered the original cotton with a thin foam, glued in place to help puff out the new cover’s material.
    With the lower seat complete, we set it aside and started on the back. Here we covered the original cotton with a thin foam, glued in place to help puff out the new cover’s material.
  20. We set the seat back on the floor, and starting with the new cover inside out, we started sliding it down over the frame. Dry silicone spray helps greatly here. Slide the cover down while aligning the seams, and be careful to pull only on the seams to avoid tearing them or the rest of the material. Once in place, hog-ring it at the base of the seat.
    We set the seat back on the floor, and starting with the new cover inside out, we started sliding it down over the frame. Dry silicone spray helps greatly here. Slide the cover down while aligning the seams, and be careful to pull only on the seams to avoid tearing them or the rest of the material. Once in place, hog-ring it at the base of the seat.
  21. The seat-back cover needs to be secured to the lower section of the seat as well, so after cleaning up the four bolts that hold the two sections together, bolt the seat sections to each other.
    The seat-back cover needs to be secured to the lower section of the seat as well, so after cleaning up the four bolts that hold the two sections together, bolt the seat sections to each other.
  22. Finish up stretching and ringing the last flap of cover to the lower seat springs, and then bolt the seat tracks in place again.
    Finish up stretching and ringing the last flap of cover to the lower seat springs, and then bolt the seat tracks in place again.
  23. Here’s our finished product, now firm, even and comfortable. The last few wrinkles are easily taken care of by setting the seat in the sun, letting it heat up, and wiping it down with a cold, damp rag to shrink the vinyl.
    Here’s our finished product, now firm, even and comfortable. The last few wrinkles are easily taken care of by setting the seat in the sun, letting it heat up, and wiping it down with a cold, damp rag to shrink the vinyl.

Comments are closed.